
How to make homemade surfboard wax

Most commercial surfboard wax is made from paraffin — a petroleum by-product that doesn't biodegrade and slowly leaches into the ocean every session. Making your own wax at home takes about 20 minutes, costs a fraction of shop price, and uses ingredients that are 100% natural and ocean-safe. This guide gives you three tested recipes (tropical, warm/cool, and cold water), a complete temperature reference, and every tip you need to get it right first time.
Why Make Your Own Surfboard Wax?
Commercial surf wax is dominated by paraffin, a crude-oil derivative. When you wax your board, tiny flakes break off in the water with every session. Over a surfing lifetime, that adds up. Eco-brands like Sticky Bumps Organic and Mrs. Palmers have moved toward beeswax-based formulas, but they still cost €5–€8 per bar.
Homemade wax using beeswax, coconut oil, and pine rosin costs roughly €1.50 per bar and performs just as well — often better, because you can tune the hardness to your exact water temperature.
The three ingredients you need:
| Ingredient | Role | Where to buy |
|---|---|---|
| Beeswax | Base — provides hardness and water resistance | Health food stores, online, beekeeping suppliers |
| Coconut oil | Softener — makes the wax pliable and easy to apply | Any supermarket |
| Pine rosin (tree resin) | Tackifier — adds grip, essential for cold water | Incense shops, online (sold as granulated rosin) |
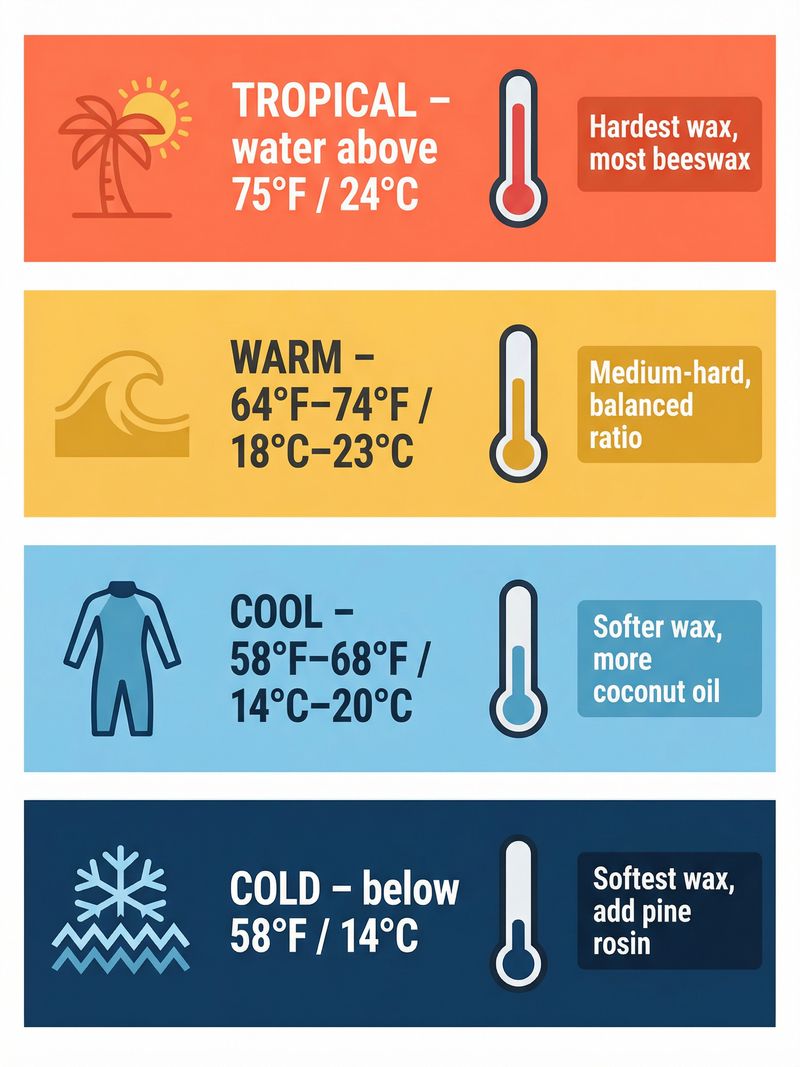
The Temperature Rule: Harder = Warmer
This is the single most important principle in wax-making. Wax that is too soft for warm water turns into a greasy mess on your deck. Wax that is too hard for cold water won't grip at all.
More beeswax = harder wax = warmer water. More coconut oil = softer wax = colder water. Pine rosin = added tackiness = essential for cold water.
The Three Recipes
Recipe 1 — Tropical Wax (water above 24°C / 75°F)
This is the hardest formula. Without hardness, tropical heat will turn your wax into a slick, greasy film within minutes of paddling out.
Ingredients (makes approx. 4 bars):
- 200g beeswax
- 50g coconut oil
- No pine rosin needed
Ratio: 4 parts beeswax : 1 part coconut oil
Recipe 2 — Warm / Cool Water Wax (14°C–23°C / 58°F–74°F)
This is the most versatile recipe — it covers the water temperatures you'll find in Europe (Portugal, Spain, France, Canary Islands) and most of Australia outside peak summer.
Ingredients (makes approx. 4 bars):
- 150g beeswax
- 50g coconut oil
- 25g pine rosin
Ratio: 3 parts beeswax : 1 part coconut oil : 0.5 parts pine rosin
Recipe 3 — Cold Water Wax (below 14°C / 58°F)
Cold water wax needs to stay soft enough to grip even when the water is near freezing. Pine rosin is essential here — it adds tackiness without adding hardness.
Ingredients (makes approx. 4 bars):
- 120g beeswax
- 60g coconut oil
- 40g pine rosin
Ratio: 3 parts beeswax : 1.5 parts coconut oil : 1 part pine rosin
Step-by-Step Instructions
These steps apply to all three recipes. The only difference is the ingredient quantities and the order in which you add the pine rosin.
What you need:
- A double boiler (or a heat-safe bowl over a saucepan of simmering water)
- A wooden spoon or silicone spatula
- Silicone molds, an ice cube tray, or a shallow baking dish lined with parchment paper
- A kitchen scale
- Ventilation — open a window, or work outdoors
Step 1 — Prepare your workspace
Cover your work surface with newspaper or parchment paper. Beeswax and rosin are extremely sticky when hot and difficult to clean once hardened. Have your molds ready and your ingredients pre-measured in separate containers.
Step 2 — Melt the beeswax
Place the beeswax in the top of your double boiler over low-to-medium heat. Stir occasionally. Beeswax melts at around 62°C / 144°F — do not overheat it or let it smoke. Never melt wax directly over a flame; always use a double boiler.
Step 3 — Add the pine rosin (cold water recipe only)
Once the beeswax is fully liquid, add the pine rosin and stir continuously. Pine rosin has a higher melting point than beeswax, so increase the heat slightly and be patient — it can take 3–5 minutes to fully dissolve. The mixture should be smooth and lump-free before you proceed.
Step 4 — Add the coconut oil
Remove from heat (or reduce to very low) and stir in the coconut oil. It will incorporate quickly. Stir for 1–2 minutes until the mixture is uniform.
Step 5 — Add fragrance (optional)
At this point you can add 5–10 drops of essential oil — coconut, citrus, and vanilla are popular choices. Stir well to distribute evenly.
Step 6 — Pour into molds
Carefully pour the hot mixture into your silicone molds. Silicone is ideal because the wax pops out cleanly once hardened. If using a baking dish, line it with parchment paper first.
Step 7 — Cool and harden
Leave at room temperature for at least 3 hours. Do not refrigerate — rapid cooling can cause the wax to crack. The finished wax should be completely solid and opaque.
Step 8 — Remove and store
Pop the wax out of the molds. Store in a cool, dry place — a tin or a beeswax wrap works well. Avoid leaving it in a hot car or direct sunlight.
Pro Tips
Base coat vs. top coat: Apply a harder base coat first (use your tropical recipe even in cool water), then apply your temperature-appropriate wax on top as a top coat. This gives you better grip and makes the top coat last longer.
Grating the surface: Once your wax bar has hardened, you can run a coarse grater over the surface to create a rougher texture. This makes it easier to apply in circular motions and builds bumps faster.
Adjusting hardness: If your first batch is too soft (leaves greasy marks on your hands), increase the beeswax ratio by 10–15% in your next batch. If it's too hard (won't build bumps), add a bit more coconut oil.
Cleaning your tools: Clean everything with boiling water immediately after use. Once hardened, beeswax is very difficult to remove.
Mold ideas: Ice cube trays make perfectly sized bars. A silicone muffin tray makes large pucks that are easy to grip. A shallow baking dish makes a slab you can cut into bars with a knife.
Frequently Asked Questions
Yes — raw beeswax (unfiltered) and cosmetic-grade filtered beeswax both work. Raw beeswax has a stronger honey scent and slightly more natural impurities, but performs identically. Avoid beeswax blends that contain paraffin, which defeats the purpose of making a natural wax.
Pine rosin (also called pine resin, colophony, or tree resin) is most easily found online or in incense shops, sold as granulated or powdered resin. You can also find it in violin shops (it's the same substance used on bow strings) and some hardware stores. Avoid rosin that has been treated with solvents.
Stored in a cool, dry place away from direct sunlight, homemade beeswax surf wax will last indefinitely — beeswax does not go rancid. On your board, it lasts as long as commercial wax, typically 1–3 months of regular surfing before you need to strip and re-wax.
For most surfers, yes. The grip and durability are comparable to mid-range commercial eco-waxes. The main difference is that commercial waxes are manufactured to very precise hardness specifications, whereas homemade wax requires a bit of experimentation to dial in the right ratio for your water temperature. Once you find your ratio, it's just as good.
Yes — natural colourants like mica powder, beetroot powder, or spirulina can be stirred into the hot mixture before pouring. Use sparingly (1–2% of total weight) to avoid affecting the wax properties. Synthetic dyes also work but are less eco-friendly.
Too soft: increase the beeswax ratio (add 10–20g more beeswax per batch) or reduce coconut oil. Too hard: add more coconut oil or reduce beeswax. For cold water wax that isn't tacky enough, increase the pine rosin slightly. Keep notes on your batches so you can replicate the one that works.
Ready to Put That Wax to Good Use?
Making your own wax is one thing — but the best way to improve your surfing is to get in the water as much as possible. A surf camp gives you structured coaching, consistent waves, and a community of surfers at your level.
If you're based in Europe, check out some of the best destinations for surf camps:
- Surf camps in Portugal — Peniche, Ericeira, Algarve
- Surf camps in Spain — Basque Country, Galicia, Canary Islands
- Surf camps in France — Hossegor, Biarritz, Brittany